Friday 24 October 2014

PHOTO BOX INSPIRED BY MISS JULIE ANN, FOR PAPERARTSY......

Hello my Lovelies, warning, warning, warning, Will Robinson, this is PHOTO HEAVY. Sorry I did a lot of stuff on it, it took me 2 weeks to create. If you want to stay around you had better grab a large cuppa. I'll try to keep the nattering to a minimum, hahaha, wish me luck with that ^-^.....
When Miss Julie Ann posted the Gift of Reading here, on Oct. 9th,  I was blown away,if you haven't seen it, it is well worth the look. I have been desperately, madly creating this gift box. I looooved creating it, it brought me such joy, thanks so much Cuz, I truly fell in love with yours, once I saw it, I just knew I had to make something..


     This is the picture frame I'm making for my friend Jan, I'll be decorating the frame and making fairy pics to match her bathroom.
It's a little snug, might have to wrap it in tissue when I finish it. It is her BD as well in Dec, so this will be her 2 gifts all taken care of....

                    These photos I took  before I added the Fairy's..

         
  I tried to follow most of the techniques Julie Ann used, I'll try to remember everything I did :O).
I started by cut it out of a huge piece of cardboard,( I have a huge stock of these ) using the picture for the template and I reeeeeally wished I had a larger area to work on, I kept having to fold the side up, fold the sides up, with all the different layers, crazy..
I brayered  some fresco paints, London bus, beach hut, hey pesto and zesty zing to color the background.
Stamped the french script in white paint, stamped  the funny green lines, they are a with stamp I made agggges ago out of clay, it didn't stamp fully, it is a bamboo tree, but I was embracing the mistakes :)...


I stamped more script  from a Paper artsy stamp in Tim's gathered twig, I made the circles with a pill bottle top and white paint, I made a puddle of Inca Gold, for the gold circles..
 I stamped Lady bugs in all the circles and tiny lady bugs all over, it made the large Lady bugs all different colors, love how they turned out....


I double bumped,  a Paperartsy leaf stamp in Fresco's, London bus and hey pesto. sorry the photo is upside down. I learned a few lessons while creating this, I prefer it with a stamp that is plain, it might be just me but it looks messy with the swirls in the stamp, normally I love this stamp.. 


You can faintly see a window cut out, they open, I put masking tape on the window, then was going to take it off leaving the shutters plain. I like it so much I decided to leave it on...


 I stamped 8 different fairy stamps on tissue, added 4 to the inside , 4 on the outside...


 I painted the parts white, I was going to color, on the back, then colored the front with fresco paints, lesson 2, I should have added water to the paint to make it more transparent, I added a golden glow around them with Inca gold and a tiny bit of water.


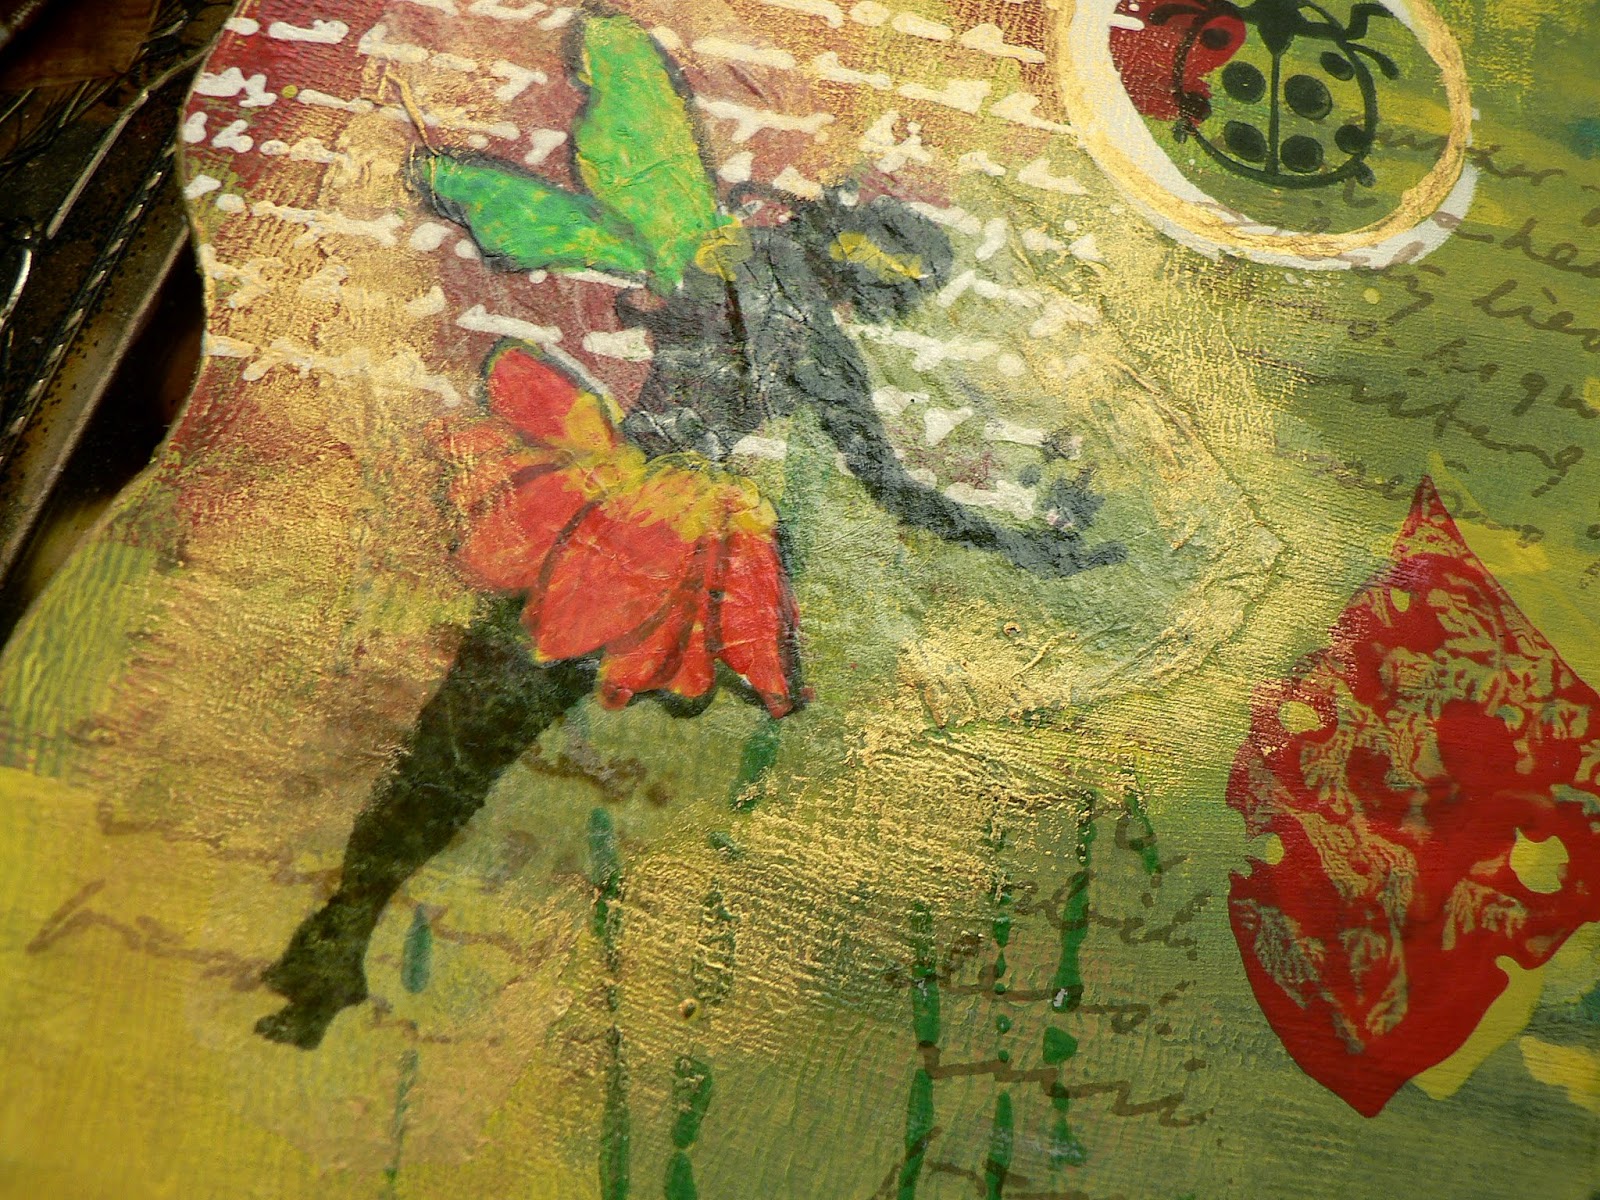
 I love how it all came together once I added the glowing fairies..


These are photos before I added the vines,faeries and embellishments...


 The out side I gessoed, then tried to create 3 walls that looked like they were falling apart and had also suffered a fire.....
I used a stone wall stencil with Golden's paste, this is the outer layer it was a beautiful stone wall a one time..
Painted the whole thing with white paint, gesso and a tiny bit of black water color paint from a tube to give it a greyish finish..
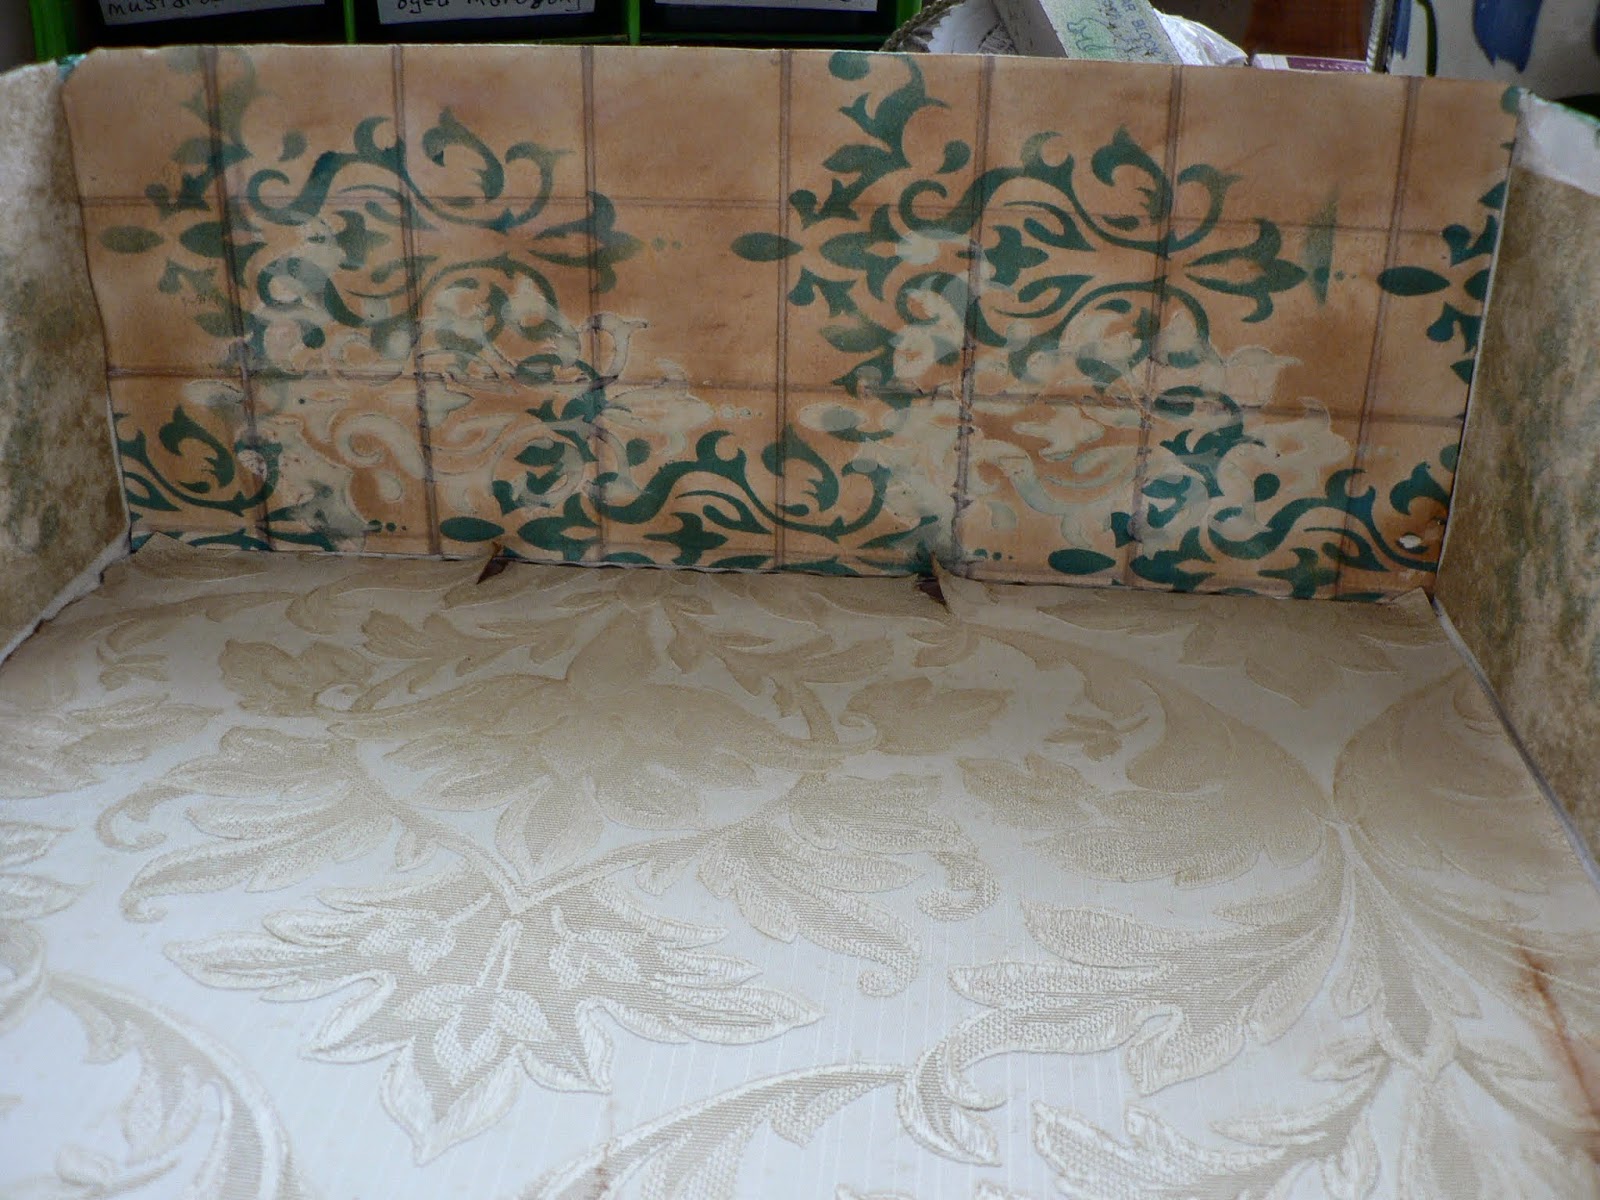
I stenciled a tile pattern on the back, a brick pattern on the front. this is all one stencil from a children's craft set.
 I used Tim's rusty hinge for the brick . Rusty hinge and mowed lawn for the tile pattern, that's what it looks like to me, might be a checker board pattern..


 I tore some of the top layer of the cardboard, then used a lighter to burn it away, this will become the bottom layer, after the fire..


I wanted to create a window, I used the Gothic window Julie Ann sent me as a template, I cut off the top layer of the cardboard leaving the corrugated on to create the shutters, I adore Gothic windows...


This is how it looks closed
I sprayed it with some clear lacquer to seal the ink.. 

Photos of it after embellishing it...


I stenciled some vines with fresco paint, on all three sides


I made a door out of cardboard, peeling the top layer off then burning it again, then gessoed it a couple of times. I painted some pieces of broken belt and bracelet, for the handle, hinges and lion knocker, painted it with rusty hinge paint, then poured some real rust powder on it, let it dry, love the rusty look it gave them...


I used a broken piece of earring for the emblem over the door, I brightened it with Inca Gold...
I painted these fairies with cheap water color paint.
 Lesson 3, I used way too much sparkle with modge poge, distress clear rock candy and ultra fine glitter. I was trying to make it look like fairy dust, had I added some water to it, it would have dispersed it better, and you could have see the image better..


 I made a frame for the window out of funky foam, gessoed it 3 time's and used a heat gun to dry it, till it created bubbles..


I made some washi tape to hold the frame of the box together, with medical tape, colored it with rusty hinge and Forrest moss paints.
I stamped some vines with rusty hinge and mowed lawn ink then stamped the fairy shoe and magical symbol in black momento ink.


All done, if your still here God bless you, this was so long sorry..
 I am entering this in the October Challenge at Paperartys
here, Miss Julie Ann inspired me to create something to enter and boy did I have some BIG FUN making it, thanks to you all...

Hope you all have a wonderful weekend, ((( BIG HUGS )))...

                                           NAMASTE!!!!

Thursday 23 October 2014

TAG FOR SHEILA FROM TONNIECE....

Hello my Lovelies, had to share this amazing tag with an envelope.
I just love it and will have to try to create one.
Tonniece crocheted some sweet tiny flowers for her too....  
On with the showing.....


Tonniece's creations are always so elegantly gorgeous.......
Thanks for stopping by my nest, still sharpening the claws at my desk, madly trying to finish my creation before the end of the month.Then try to get into CCCChristmas mode and the fun madness starts all over again....... Hope you all have a wonderful creative week, ((( BIG HUGS )))...

                                     NAMASTE!!!

Sunday 19 October 2014

DREAMING WITH THE DRAGONS OF SPECIAL FEATHERS


Hello my lovelies, when I saw Silvia picked the letter V and feathers I was so excited, I have a Valise full of my baby feathers my Magpie Mom had saved for me to start my own nest with, I also had a few special feather I found with them. I just had to make a tag to go along with it.....
The Dragons team here have made some fabulous creations to inspire us all...

This is the Valise, made out of cardboard from a writing pad. I decorated some paper to look like eggs.

                I cut out some strips of leather for the straps..


I used a flat piece of cardboard for the backing then a corrugated piece for the top piece, I made the tree with masking tape, painted the tree with brown and some green and grey for the moss, painted the sky with Fresco beach hut.

I made a feather stamp, and then made some washi tape to frame the tag with it. The large feather my friend Tonniece gave me, I fussy cut it out..


    There eagles are flying around, hopefully they don't see my                treasures and swoop down for a closer look...


 I added a real Quill to the tip, there is a tiny nest in the hole in the tree.....


My beautiful feathers inside, I used a twig to hold it open,for the letter I used a piece of cardboard covered with the same paper and wrote the letter with a calligraphy pen and ink and hung it on the twig

I used some eyelash wool to make the topping, I made a feather on part of it, with a piece of material on the back..


Thanks so much for visiting my crazy nest, I did enjoy making this tag soooo much it was a JOY dreaming with the dragons again, I had company all weekend, lots of laughs and crafting. today I can visit and get back to my desk. I wish you all a wonderful creative week, ((( BIG HUGS )))

                                                 NAMASTE!!!


Wednesday 15 October 2014

25th ANNIVERSARY CARD

Hello my lovelies, just dropping in for a wee bit, I've been real crazy busy at my desk doing a few things at a time again, I have been so inspired by all of you amazing artist who kindly visit my crazy nest.
The new challenge with the Dragons is with feathers, well you can guess I was flapping my feathers all over my room, I'll save that for my next post, oh and I'm working on a special box eekkss that's  been some big fun. Enough nattering :).
On to my card, a Lady at swimming asked me to make a 25th anniversary card for the gang at swimming, to sign...


This was pretty basic, I used a 12 x 12 sheet of my botanical pad, I used a plain sheet for the base, stamped on it with some script, and one of my favorite sentiment. I cut out another embossed page in strips for the design on the top and bottom edged everything with pomegranate stamping up ink.


I tore this piece from a bought card from my stash , edged it with the pomegranate ink, and used worn lipstick on the inside, it makes the words stand out better.


I cut the hearts in the frame out from another card in my stash, stenciled in the 2 and 5 in white, gold and black, I roughed up the frame with my finger nail ,I have very hard ones, my tools :) .. Then inked it with mowed lawn. I added a few pearls from the dollar store..


The back needed some weight, I cut out the embossed lace from the same paper, it's lovely paper. I added some dots along the top of the lace with my faber castell  big white pen..


I added a small sentiment inside, leaving lots of room for all the signatures.
I"ll be around when I'm taking breaks from my desk, it's calling to me right now, really, I have to gesso my cardboard box..
 My buddy Sheila is off this weekend, I and my friend Jan gathered a bunch of gorgeous maple leafs, Sheila and I are going to make some roses out of them, I'm real excited about that..
Hope you all have a wonderful creative week,  ((( BIG HUGS ))).

                                            NAMASTE!!!

Saturday 11 October 2014

MY DRAGONS DREAM MAGIC CUPBOARD...

Hello my Lovelies, it is Thanks giving weekend in Canada, boy I'm thankful for every one of you who visit my nest and leave me such wonderful encouraging comments...
I have been making lots of tags for the challenges at with the Dragons, I finally had no more room on my wall to hang them, so I though I would make something to hold them in, a magical cupboard for them,
I would like you to meet the real Magpie Di, she is guarding the cupboard, keeping her eyes on things :O).......


I used a lovely boot box my DS Sandy sent me, I added masking tape all around the edges to make it sturdier, gessoed it, then painted it with my Fresco paints, I created my mask from a wall paper boarder, they are just leaves, but I thought they would make a wonderful mask. I made some lovely green eyes, which I always wanted to go with my red hair :). I stamped some script with white paint and randomly stamped the whole alphabet all over..

    I used my my white sharpie to add dots around them mask..


I received some Italian dictionary pages from Miss Gio, I have been saving them for some thing special. I cut the page in half  from corner to corner, one I crumpled up, ran Tim's gathered twig over it, then stamped on it..


The other piece I covered with watered gesso then stamped on it, love them, thanks Miss Gio..

                                         A few close ups on the sides..


This is the top...


For the inside I used pieces of wall paper, aged them up.

I stenciled on top of the side pieces with  Tim's ink.. 


For the floor I created a terrazzo tile floor, with paper, I gessoed through my stencil, then used ink on the same stencil. I then created the tiles by scoring it, I love how it turned out... 


Here is my pile of tags, now that they are going to be hanging, I wanted to cover the plain cardboard back, I have used my inked paper towels to cover them , they all match now..


 I still have to make the doors, I'm waiting till my parcel from my DS Sandy, she is sending me a stencil with Roman lettering eekkss can't wait to play with that. I'll post it when I finish it. Sorry another long post, but I had a lot to share with you..
Thanks so much for visiting my crazy nest, have a wonderful weekend, love you all,    (((( BIG HUGS ))))..

                                        NAMASTE!!!