Wednesday 29 May 2013

WOYWW


Hello all and welcome to WOYWW,  the best blog hop around
blog land thanks to out lovely Julia at
She has been doing this for 4 years, its the anniversary today.
stamping-ground.blogspot.ca
Grab a cuppa and have a good nose around at all the wonderful
artist on the blog hop.
I'm cleaning up now after making my monastery, have to put all my
Chinese things away to start my next project.
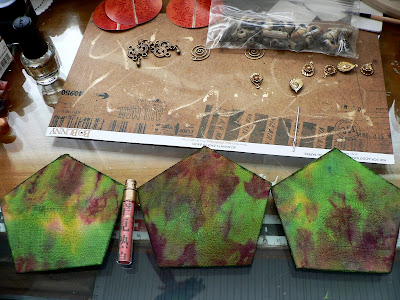
I had a little bit of gesso mixed with black water colour paint left,
from the monastery pics below this post.
I had a piece I had sprayed with shimmer inks on bubble wrap
then layed it on the card stock and left to dry overnight.
I used up the gesso by using a stencil , the right one has too much on it
the second on the left is better.
I put some on bubble wrap and layed it on my tag, then drop some
Ecoline burnt sienna and blew on it with a straw.
This is the first time using this colour and I think its my favourite now.
Thanks for stopping by and have a wonderful creative day..
NAMASTE !!!
Posted by Picasa

Tuesday 28 May 2013

TIBETAN MONASTAERY PART 2


I had made a lovely stand for it out of styrofoam, painted, inked it
then it was too small so I had to make another, I used cardboard,
, I made a step up to the main temple, then sat the other 2 beside
it, this was perfect till I urned it around:):)..
 

I colored 2 beads gold, cut up some tiny sticks for
the incense holder..
 
Posted by Picasa

THE BACK VIEW...


A overhead view


After I mounted them the bottom of the doors were covered so I cut
2 circles out and added some tiny glass marbles to the make it look like
the doors opened out..

I do love how it turned out, and thanks Anne I am very
proud how it turned out.
Thanks for visiting I appreciate everyone for looking.
Have a wonderful creative day..
NAMASTE!!!
Posted by Picasa

Monday 27 May 2013

TIBETAN MONASTERY PART 1


Sorry for the long post, lots of stuff I did ^-^.

I have finally finished my monastery, lots of changing fixing, we learn
from our mistakes, don't we :O).
I first gessoed them, then covered both side go figure.
The front I used some gorgeous hand made paper from Malaysia,
I purchased 20 pages at a second hand store,there was 2 large
photo albums full of some amazing pages, I used them to cover
altered journals and only payed $1 a page. they have all sorts of
leaves, fibbers, it has lots of texture, I stained them all with
Tim's walnut ink.
I had no idea how to do the roofs, a bit of cardboard was sitting
on my desk, light bulb went off ^-^
I sliced it in 3 strips, these pieces fit perfect, imagine that:).
I cut 3 circles out of some paper from the steam punk botanical.
trimmed them in my gold ink.
The door handles are the backing for pierced earrings, I love them:O)
I was skpeing my DS in England, I was telling her about my make and
She told me they were Tibetan pray wheels, which was perfect.
I love the Dali Lama, which is why it is now Tibetan lololo,
always changing.
Change them I had to shesh, when I had one in my hand, I realised they spun
around, I was soooo excited butttt, I had them upside down.
So I had to take them all apart, now they can spin after I mounted them,
not that anyone will spin them, but it's kool anyway..
 
The backs hhmm I had some lovely dyed material I had gotten from
a Textile artist in Norfolk, Marion Barnett, she had a huge bag full of dyed pieces
all kinds of material. I fell in love with this piece, it's an old tablecloth
 the colours are yummmmy, I had to cover the back of them with it.
The doors are games pieces, I gessoed them inked with worn lipstick
stamped Chinese characters, the single on means beauty,
the other 2 mean wisdom. I used a screw clasp for a necklace for this handle.

I wanted the beads I got at the dollar store to hang, I first tried to use
thread, that didn't work, then I got out my wires and BINGO..
Worked perfectly through the holes in the cardboard, I fell in love
all over again with cardboard :O)...
 I put the wire through the back, added my bead, curled the end
to stop it from falling off then bent it where I wanted them to hang,
flip it over and curled the back easy peasy, killed my wrist but it
worked like a charm..

I curled up the ends on the roof, added some pieces of my jewelry,
It is a flower, like a lily pod.
The buddhist curve their temple roves, they believe they help ward off evil spirits...
Thanks for staying around to read all of this, and for visiting.
I wanted to tell all those wonderful woman whom I visit everyday
all inspire me to heights I never thought I could reach.
Thanks so much for the inspiration and your support.
NAMASTE!!!.
Part 2 tomorrow..
Posted by Picasa

Saturday 25 May 2013

NEW BIRTHDAY TAG


Hello my Lovelies, I had to make a BD card for my friends company,
he was visiting from Amsterdam ans was turning 25,
I had not met him before so it's a little strange to make a card, for me, that
I didn't know anything about him, so I tried a few normal men's cards like
a suit, I have said I'm not too good at the instructions things:O).
So after a few failed attempts, I just decided what the heck I;ll
just do my own thing and grabbed one of my tag and holder to alter
and away I went LOL. I love the 7 gyps Best of Times set, used a sheet
from Steampunk Botanic 12 inch pad I used this to make the inside tag.
The holder I used a sheet of paper brown paper pages I was wiping my
paint brush while using some gold ink, not wanting to waste any:).
This was a lovely background so I stamped all over with the time stamps.
I had a cork sheet I got at the dollar store cut the frame, used some
beige cardstock put on some sticky letters went over it all with Tim's
tea and walnut ink, then removed the letters.
I did stamp them on the happy birthday side but forgot to take a
pic, added some string and twine to pull it out.
I made the envelope from, a larger, one cut it to fit and
stamped it then uses a nib pen with sepia in for his name.
The pics of this are in the last post:)..
Thanks for stopping be to visit, hope you all have a wonderful week end.
NAMASTE!!!
Posted by Picasa

BIRTHDAY TAG


Posted by Picasa

Wednesday 22 May 2013

WOYWDW....


Welcome all to the BEST blog hop in blogland, if you can get
a cuppa and sit back and be amazed at,
http://stamping-ground.blogspot.ca/
 I started out making some houses from game cards shaped like that, kool.
Well along the way It turned into a Chinese Monastery, lots to do left on these
The glass vials are from my insulin, I have tons of them, you
must know I can't threw anything out:O).
So I finally got to use them.
Thanks for visiting and have a wonderful creative day.
MAMASTE!!!!
Posted by Picasa

Monday 20 May 2013

STAR BOX


Hello my Lovely Ladies...
I finally finished the lid to my box, I made a few black flowers and ended
up just using one, I think it was the pretties one, might be the sparkle :O)..
When I added the sequined kinda of heart, it was off an old dress and the
black dangly necklace piece, it was a little heavy so I made a stronger
lifter upper, LOL to pick it up, it was an old earring.
I added an old silver shoe buckle and a big black bead and 2 other pair
of earrings on either side.
Added some lovely feather from Tonniece, a couple of little white flowers.
Of course I had to add the nest with some lovely eggs inside.
I'm still working on the Monastery :).
Thanks for visiting and have a wonderful day..
NAMASTE!!!!
Posted by Picasa

SOME CLOSE UPS


Posted by Picasa

Sunday 19 May 2013

WHAT'S HAPPENING HERE.


I just got to my desk yesterday, and have a few thing happening:)..
I made the star box a while ago, but I had no idea how to decorate
the lid.
I added some acetate under the punched boarder to strengthen it.
I made some flowers from crepe paper, I have half a shoe box of old
crepe paper, do you remember when it was thick and double sided,
different color,its very thick and lovely and sturdy,.
I found a couple of videos how to make flowers with crepe paper.
Mine came
out a little different,,
I like how they turned out.
The one with the read clip on it is or was a deep purple one one side a
pale greyish mauve, I made the flower then rubbed it in black soot.
I sprayed it with water to mix the ink, but when it got wet, I became
dark purple, will se how it looks when dry..
I have some feathers to add and a few bits and bobs..


I wanted to empty the ink I made so,
so I sprayed, dropped it in blobs, blew it with a straw,  I let it run on the page..
 I used my walnut ink for the first time in oh my 2 years.
It's been sitting in my fridge and ageing.
I sent some in my giveaways and poured a ink bottle full myself.
I did the same thing,dropped it blew on it ran it along the tags.
The ink is quite dark, black walnut:):)
I'm going to put some in a spray bottle and add alcohol, see if it lighten
it up.
I'm also working on my umm, houses, umm Monastery it seems to becoming:O).
Show that soon,
Thanks so much for visiting....
NAMASTE!!!!
Posted by Picasa

Tuesday 14 May 2013

TONNIECES BD CARD


 I finally got this darn card made, I'm just not good with instructions,
on the 3rd attempted it finally worked, this is her card with the shoe..
Shoe posted below...

Posted by Picasa

STICK PIN HOLDER


Finally get to post the shoe, today was Tonniec's BD so we went out
for lunch down by the Bay Pier 4 (Lake Ontario)
Had some lunch and she opened her gifts there, fun time had by all..
Lots of pics:).
I had the shoe gessoed last time I posted it.
I used Tim's inks with felt pad and pounced red green and blue.
I stuffed the shoe with quilt stuffing.
I added liquid gold leaf with a feather.
Added a piece of card stock to match on the back of the heel.
I added ribbon, from Tonniece, I gathered it to make a frill.
Made a bow out of it as well.
I took apart a necklace and fit it around the shoe, made some
dangles off the back, love that part:).
I added a piece of it on the middle of the bow.
I covered the bottom with red felt..
Close ups below
Posted by Picasa