Saturday 29 March 2014

DRAGON DREAM CHALLENGE ZEN

Hello my Lovelies  I'm entering the challenge again with the Dragons, Silvia picked the letter Z with a face, they have some wonderful tags their to inspire you, have a look here, enjoy, maybe even play along..
 I had to put my thinking cap on for this one, when Zen popped into my head, I googled image it and all these zen gardens came up, they were white with circles and black shiny stones with bamboo shoots.
I decided I'd create my kind of garden that would soothe me..

I cut out a piece of water color paper, and my time cards used some of Tim's lemonade, then went over it all with broken china to create a lovely green, trying to create the circles I used the fiber paper (underneath the tag), you can see it better on the back, It got cover up in the front. I stamped tiny bamboo shots all around the frame both sides. I used a pill bottle top with some watered down white paint to create more circles, then some of the paint through some sequin waste. Went over it all again with broken china..
 I stamped zen on another fiber paper podged it on, glued some green glass beads and painted them gold, I used gelato's to dye my seam binding and ribbon, then stamped the bamboo shoot in liquid gold leaf...
 My cute face is a Chinese bee my Sis had photocopied I punched her out, trimmed it in gold, punched out a piece of black card stock and a circle of cardboard to make her sit up. I cut one of the circles of the fiber paper  and put it behind it, I trimmed it all with a gold ink pen, back and front...
 I did almost the same with the back, you can see the circles better here, stamped the bamboo all around the edge and added the word there too
This is my ZEN Garden, hope you liked it, please have a look at all the other tags made, they are fantastic. I love dreaming with the Dragon team....
Have a wonderful weekend, ((( BIG HUGS )))...

                                             NAMASTE!!!

Thursday 27 March 2014

MY BRO'S BD TILE

Hello my lovelies, thought I'd show the tile I made for my DB it's going in the post tomorrow, it's not perfect but my redneck brother will like it LOL...


I made this a few months ago, with inks and stamps, on water color paper, it's was quite large, after I cut it down, I decided to cut it up and make a big tile out of it, I cover them with 7 coats of podge..

 I cut all the pieces, glued 1/4 in cardboard  on the back of each piece to give it depth, glued them to a board, grouted it with colored molding paste I mixed up with some water colors..
 Don't ask me how it ended up with a piece out of place, so trying to frame it shesh I tried everything I had, I ended up wrapping jute around it 6 times with hot glue, you can still see the crooked piece..
 Since he's a woodsy guy, I added some twigs on top, it's still a little wonky but that's okay, I like the natural elements...
Thanks for visiting my nest, I've done my tag for the new challenge at the dragons den, I'll post it later still have to take photo's of it, then back to my box, that went on the back burner while I had to make the tag, you all know when you get in the flow you have to go with it...                        ((( BIG HUGS )))

                                         NAMASTE !!!!

Wednesday 26 March 2014

WOYWW???

Hello my Lovelies, I can't believe it Wed. already, time is flying by too quickly, anywho, it's time for us to share our desk with the wonderful Miss Julia, we gather at her place,here grab a cuppa and enjoy...

I'm revamping a box from perfumes, love all the compartments, lots of places to add things, I am covering it with masking tape ( it makes the box stronger) then painting it white so when I cover it with the used coffee filter you won't see all that pink underneath, just the fabulous designs from the coffee stains. 

 I've cut the filters to fit on it and some dictionary pages covered with watered gesso, not sure how I will use them but I will..If you want to see what the filters look used you can see my last post
here I used them on a Triptych..
Thanks for stopping by as usual I'm out to water fit and will do my snooping in the afternoon and probably till the weekend, can't wait to see what all the Deskers are up to, I always find so much inspiration. Hope you all have a wonderful day ((( BIG HUGS ))).

                                         NAMASTE!!!

Tuesday 25 March 2014

COFFER FILTER TRIPTYCH...

Hello my Lovelies, back with another triptych, it's a gift for Lillian
a wonderful Lady at water fit..
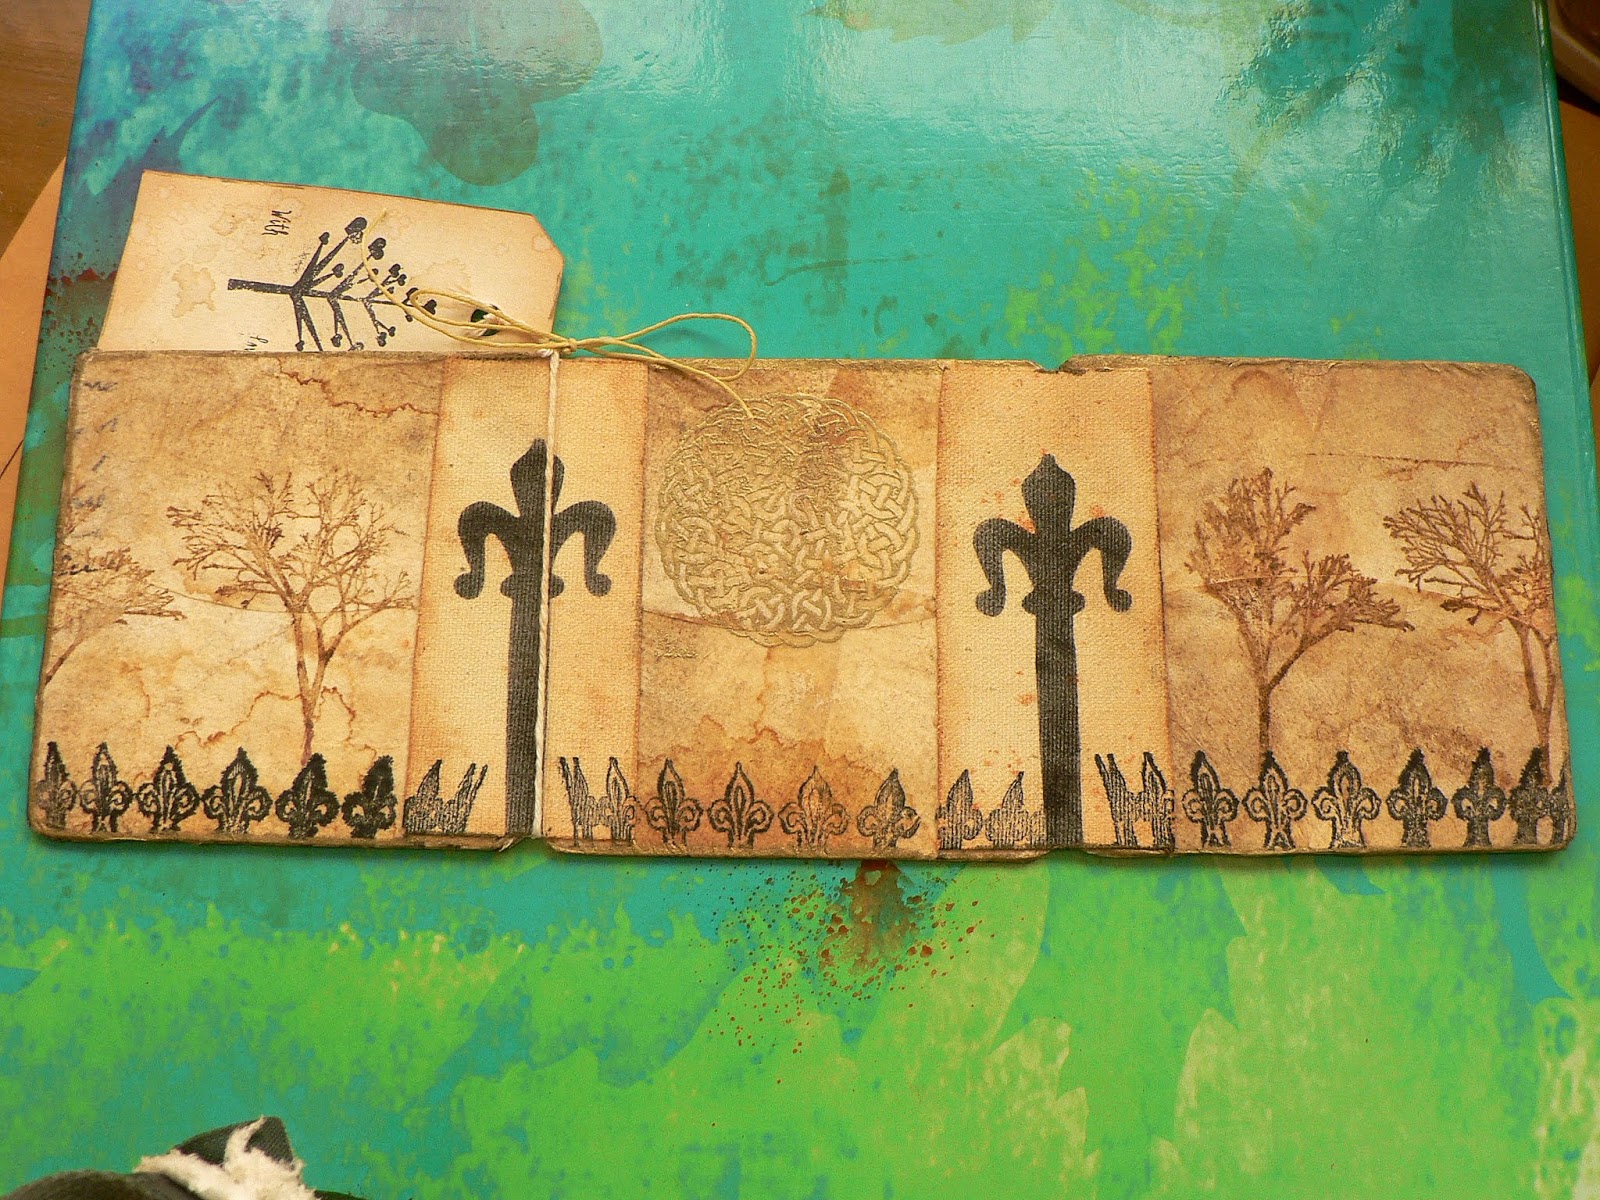
I've always loved using used coffee filters and thought I would show you how you can use them and what a lovely pattern it has.. 

 I gessoed over the beer mats then covered each with one filter, it covered both sides, I stamped some script, and some sequin waste with Tim's gathered twig..
 I punched out 2 circles from a dictionary page,  painted with water down gesso then stamped the sentiment edged them with gathered twig..
 Some stamping and a sentiment...
 Another gessoed dictionary circle with  sentiment...
 For the back I left the filter just plain, don't you love the design on it..I used some sticky back canvas to attach it together ,my Sis Sandy sent me some goodies, she had die cut a fancy key out of foil tape, I used the negative to create a post, I used vintage photo and tea stain to age it and the top of a crown stamp, trying to make the top on a fence,those tiny trees, Sandy has a machine to make her own stamps, she made me this stamp, it's 2 tiny trees, I'll be using this a lot, I looooove it..

 I gold embossed a Celtic circle on the middle panel.. I edged all the panels with a gold metallic pen..
Those gorgeous little trees again, inked with gathered twig..Hope you might decide to use some used coffee filters too. Thanks for visiting my nest, hope you all have a wonderful day, ((( BIG HUGS)))....

                                      NAMASTE!!!!

Sunday 23 March 2014

GIFT FOR JOANN

Hello my Lovelies, this is my final catch up, I made this gift for my Lovely Friend Joann form Castle Park designs, she sent me that gorgeous box, I made a small triptych for her...


I had 3 tiny pieces of cardboard from some packages, I cover them with the salted ink paper I made, I stamped the Asian stamps on tissue , the right side means beauty and the left side means wisdom.
I used some gelli plate paper on the backside, stamped the love sign right on top, I joined them with 2 pieces of wool..
This is what it looks like sitting up....
Thanks for visiting my nest, eekkss, it's my Bro's BD on the second,that creeped up on me, thanks goodness I started it before,
I finished the other triptych I was making and will post that this week and hopefully my DB gift.. Hope you all have a wonderful week.. ((( BIG HUGS )))...

Friday 21 March 2014

STAMPING AFTER BLEACHING..


Hello my Lovelies, I wanted to share what I did to the pieces I bleached, I'll keep it short and sweet, I need to make a gift for a Sweet Lady Miss Lillian from swimming, so I have to get to my desk..

This piece I just inked over the bleached, can you tell I open a new black ink pad :)..
These are my other 2 master boards, the one above I inked a stencil and stamped 2 stamps, I love the one below, just stamped the beautiful moth, that's all it needed..


Stamped 2 different stamps on this piece...


I love this one with the 2 little birds and your sweet, it looks like a map of the woods, kool... It's a magical map, can't tell you where it leads you....
Thanks for stopping by my nest, I'm off to my desk, I will be around to visit you Lovelies when I'm done.. Have a wonderful creative weekend... ((( BIG HUGS)))..

                                    NAMASTE !!!!

Wednesday 19 March 2014

WOYWW ????

Hello my Lovelies, its Wed. time for all of of deskers to show what we are doing, thanks to our hostess with the mostest Miss Julia
Grab a cuppa and enjoy snooping around the world.
This is whats on mine..


These gorgeous feather were a gift from my Friend Tonniece aren't they fabulous, she also fussy cut out these 4 gorgeous Ladies in teacups I got from my sweet Magpie Cuz Julie Ann in England..


I have lots to show so I'll keep it short and sweet, I went  a little crazy with bleach and my stamps, I had a few pages I had made but were to dark, you can use just plain colored card stock too, maybe you can try it and have some fun, I know I did and loved how they turned out

This is the start of a master board..


This is the second master board, you can see below, where I put the beach in a lid with a paper towel and stamped away....


Thanks for stopping by, hope you will give this bleaching a try...
It's  going to be a lovely rainy day, so I'm staying home and have all day to snoop at the awesome artist desks, yippee, have a wonderful day.

                                  NAMASTE!!!

Tuesday 18 March 2014

MASTER BOARD..

Hello my Lovelies, I've made a couple of master boards, this was my first one.

I used Tim's mustard seed and rubbed it all over the mixed media paper, it's about 14 1/2 in by 11 1/2 in....

I sponged shabby shutters and mowed lawn and some broken china, flicked water all over it ..
I sponged some broken china through some sequin waste to make the circles of dots
Then stamped 2 dragonflies one small and a large in memento black, I stamped My Friend in the broken china, flicked sepia ink all over with a fan brush...
 Then cut them up for ATCs, I might use these in my swap for WOYWW, or the other boards I made. They are fun and easy to make, thanks for visiting my nest, have a wonderful creative day.
((( BIG HUGS )))

NAMASTE!!!